Raku Firing Equipment Checklist for Beginners
A practical beginner raku firing equipment checklist covering the gear, safety questions, and purchases to delay until you have supervised experience.
As an Amazon Associate, PotteryKey earns from qualifying purchases.
Raku firing is fast, smoky, unpredictable, and dramatic. It also puts beginners close to open heat, fuel, combustible material, thermal shock, smoke, and ceramic work that can injure someone quickly. This checklist explains the main equipment categories before you take a workshop or price gear.
If you are new to raku, begin with a supervised class or an experienced studio technician. For the larger process, read PotteryKey's guide to raku firing. This article is not a substitute for hands-on instruction, manufacturer instructions, studio procedures, local fire rules, or common sense around flame and smoke.
Safety first: raku is not casual backyard pottery
Raku can be beginner-friendly with controlled conditions and solid instruction. It is not casual backyard pottery. A firing may involve heating ware in a kiln, removing pieces while they are glowing hot, placing them into reduction containers, managing smoke, then cooling and cleaning the work. Each step depends on location, equipment condition, fuel, weather, ventilation, and operator experience.
Before buying anything, ask practical questions. Where will the firing happen? Who is responsible for the kiln and fuel? Is the area approved for flame, smoke, and hot work? How are bystanders kept away? Gear reduces specific risks only when it is used correctly, in the right setting, with instruction.
Also keep the finished work in perspective: raku pottery is usually decorative. Do not assume raku pieces are food-safe unless the clay, glaze, surface, firing, and finished ware have been specifically designed and tested for food contact.
1. Instruction and reference material
The first item on a raku checklist is instruction. A workshop, studio orientation, experienced teacher, or well chosen reference book helps you understand the sequence before you stand near a hot kiln.
Good references explain bisque ware, glaze fit, thermal shock, post-firing reduction, crackle surfaces, and smoke staining without making the process sound too simple. If you want to browse, start with broad searches for raku pottery books, then compare author background, safety coverage, and fit with your local studio's method.
2. Kiln and firing setup
A raku setup usually centers on a kiln that heats quickly and allows controlled access to hot ware. Many raku kilns are propane-fired, fiber-lined, top-hat style, or built for rapid firing and unloading. That does not make every small kiln suitable for raku, and it does not make a home setup sensible without careful planning.
If you are still learning kiln categories, PotteryKey has guides to kilns for home studios and kilns for studio settings. Those comparisons are useful background, but raku adds concerns around ventilation, flame, fuel, heat exposure, fast access, and moving glowing pieces.
Before any firing setup is used, confirm the surface, clearances, fuel storage, hose condition, burner compatibility, local rules, and studio procedures. Do not improvise or modify a kiln without qualified guidance.
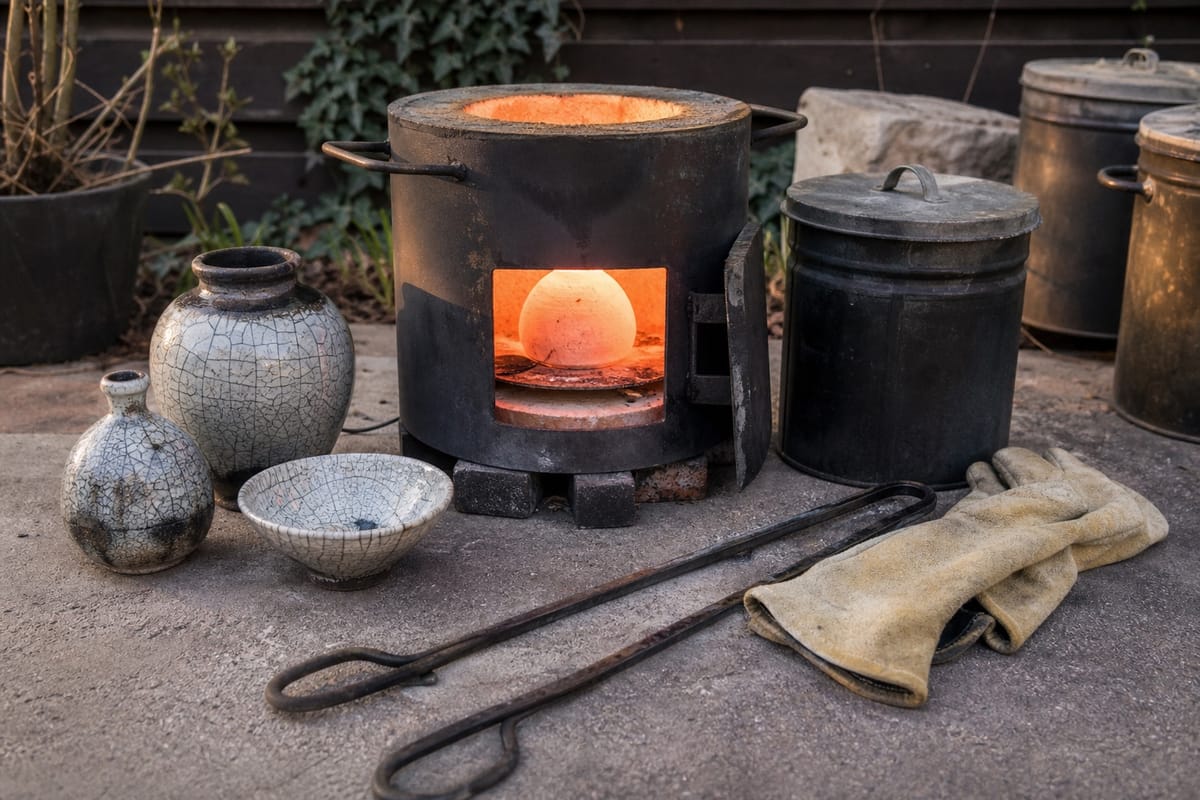
3. Raku tongs
Raku tongs lift or grip extremely hot ceramic pieces as they come out of the kiln. They look simple, which is why beginners often underestimate them. The right tongs need enough length for the setup, enough strength for the ware, and jaws that can move a piece without crushing it or letting it slip.
Different shapes may suit bowls, bottles, tiles, or sculptural work. An instructor can show how tong angle, grip pressure, body position, and a planned walking path all matter. If you are comparing options, search for raku pottery tongs, then confirm suitability before buying.
4. Heat-resistant gloves
Heat-resistant gloves are common in raku setups, but they are not magic. They may reduce contact risk during specific tasks, yet they can create false confidence if a beginner reaches too close to radiant heat or holds hot material too long. Select them for the task, keep them dry, inspect them, and follow the maker's instructions.
For research, browse broad options for heat resistant kiln gloves. In a studio, ask which glove length and material are used, when gloves are required, and when hands should stay away entirely. Long cuffs may reduce exposure, but they do not make unsafe handling safe.
5. Eye and face protection
Raku can involve heat, smoke, sparks, ash, glaze fragments, and breakage from thermal shock. Eye protection should be discussed before anyone joins the firing area. Safety glasses, goggles, or face protection may be required depending on the process.
You can research general pottery safety glasses, but the final choice should match the studio environment and instructor guidance. Standard shop eyewear may not be enough. If a studio requires specific protection, follow that requirement rather than substituting whatever is nearby.
6. Respiratory, dust, and smoke precautions
Raku may involve smoke from reduction materials, ash, kiln fiber concerns, glaze materials, and cleanup dust. Respiratory protection is not a random mask decision. The right approach depends on the hazard, ventilation, fit, filter type, and whether the concern is smoke, particulates, fumes, or dry dust.
Beginners can browse broad searches for a ceramic respirator mask, but the actual choice should be guided by the materials and process. A poor fit or wrong filter may not address the risk. Studios should also manage exposure with appropriate outdoor or ventilated firing areas, careful cleanup, and clear distance for observers.
7. Noncombustible work area
The work area matters as much as the tools. Raku should take place on a stable, noncombustible surface with clear space around the kiln, reduction containers, fuel, and cooling area. Concrete, kiln shelves, bricks, or metal surfaces may be part of a studio setup, but the layout needs experienced planning.
Keep paper, cardboard, dry leaves, sawdust, fabric, plastic bins, and loose clutter away from hot work unless the instructor is using a specific material deliberately. Wind also matters because it can affect flame, smoke, and loose reduction material.
8. Reduction containers and materials
Post-firing reduction is part of many modern raku methods. Hot ware may be placed into a metal container with combustible material, then covered to create smoke and oxygen reduction effects. That is one reason raku surfaces can look smoky, crackled, metallic, or hard to predict.
Beginners should not treat reduction containers as ordinary trash cans. Containers can become extremely hot, lids may shift, smoke can build quickly, and materials can ignite. The type and amount of combustible material should be chosen by the instructor or studio, not guessed during a first attempt. What is appropriate depends on the setup and local rules.
9. Fire readiness
Every raku setup needs a fire readiness plan before the kiln is lit. That means more than owning a fire extinguisher. Participants should know where it is, what type it is, whether it is current, who will use it, and how emergency services can reach the area.
If you are building a general checklist, research a Class ABC fire extinguisher, then confirm what your location and process require. Do not rely on a purchase alone. Fire readiness includes training, placement, inspection, and the willingness to stop if conditions are wrong.
10. Post-firing cleanup supplies
The checklist continues after the dramatic part is over. Cleanup may involve cooled ware, ash, carbon residue, glaze edges, dust, spent reduction material, and containers that stay hot longer than expected. Plan for metal disposal containers, a safe cooling area, cleanup tools, and dust-control procedures.
Do not rush to scrub, sand, or handle pieces until they have cooled appropriately and the instructor says they are ready. If cleaning creates dust, avoid dry sweeping when safer dust-control methods are available. Dispose of reduction material only when it is fully out and handled according to the studio's procedure.
What beginners should not buy yet
If you have never joined a raku firing, do not start with a full kiln setup, burner system, propane equipment, large reduction containers, bulk specialty glazes, or a complete protective gear kit chosen without guidance. The wrong purchase can be unsuitable for your space, incompatible with the firing method, or inadequate for the risk you are trying to reduce.
Also avoid buying based only on dramatic photos. Raku results depend on clay body, bisque preparation, glaze, firing temperature, timing, reduction material, cooling, and chance. Learn the process first, then make a smaller equipment list based on the studio method you will actually use.
How this checklist connects to the firing process
Raku equipment makes more sense when you connect each item to the sequence. Instruction gives you the plan. The kiln and fuel setup heat the ware. Tongs and gloves support the brief movement of hot pieces. Eye, face, and respiratory protection help reduce exposure to specific hazards. The noncombustible work area gives the team room to move. Reduction containers create the post-firing atmosphere. Fire readiness supports emergency response. Cleanup supplies keep residue, dust, and lingering heat from becoming afterthoughts.
For a broader comparison, see PotteryKey's guide to pottery firing techniques. Raku is only one approach, and it is not the right choice for every studio, surface, or functional goal.
Practical conclusion
A beginner raku equipment checklist should help you pause, not push you to buy everything at once. Start with instruction. Observe a supervised firing. Ask how the studio handles heat, smoke, fuel, ventilation, fire readiness, and cleanup. Then decide which items you truly need for your role.
If you eventually build a personal setup, do it with experienced guidance and respect for local rules, manufacturer instructions, and the limits of protective gear. The best first purchase is often a class or a reliable reference, followed by equipment chosen for a specific supervised process.