Raku Firing: A Practical Guide to the Japanese Pottery Technique
A practical guide to raku firing, including Japanese tea context, modern Western reduction methods, clay and glaze choices, safety limits, and sensible beginner next steps.
As an Amazon Associate, PotteryKey earns from qualifying purchases.
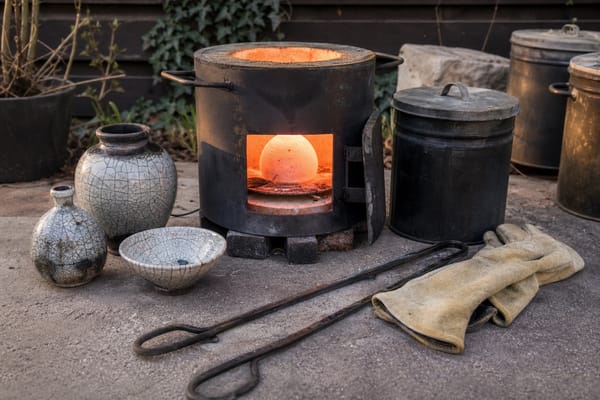
Raku firing makes the kiln feel less hidden. Unlike a slow closed firing, it puts heat, timing, smoke, and quick decisions in front of you. Pots are often heated fast, lifted while red-hot, and moved into combustible material.
This raku overview explains why supervised instruction, long tongs, protective clothing, and a clear path matter before hot ware moves. Before pricing gear, review the raku firing equipment checklist for the main safety and setup categories.
That drama is part of the appeal, but it is also why raku gets misunderstood. It is not a casual backyard shortcut or a finish that automatically makes a pot usable. This guide is practical, not a substitute for supervised instruction. Because raku involves open flame, smoke, thermal shock, red-hot ware, metal tongs, combustible material, and local fire rules, beginners should learn in an equipped studio or workshop.
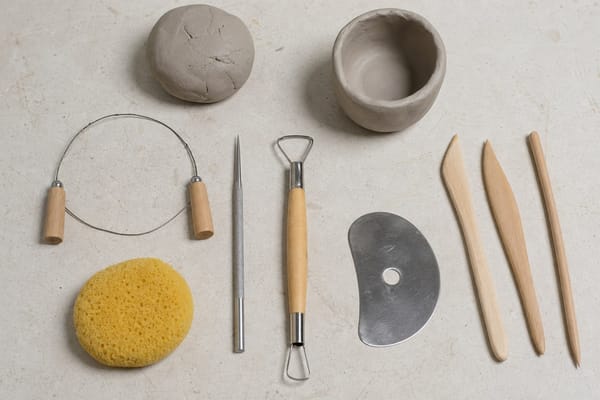
If you are still at the "what equipment would this even require?" stage, start with the raku firing equipment checklist before buying tools. It covers tongs, gloves, respirator questions, fire readiness, and the gear beginners should usually delay until they have supervised experience.
What raku firing is
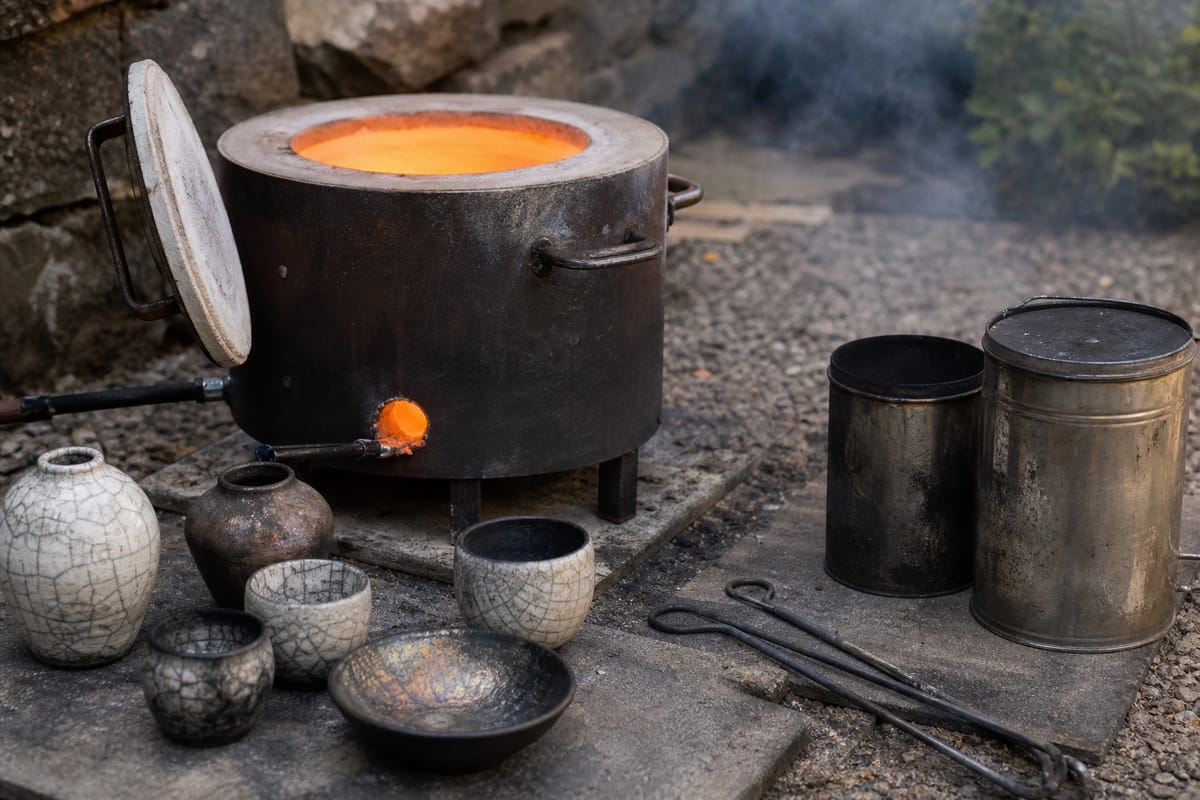
In common studio language, raku is a low-fire pottery process built around rapid heating and rapid handling. A piece is usually bisque fired first, glazed or treated with a raku-compatible surface, heated in a small kiln, and removed while it is glowing. In many Western studios, the hot pot then goes into a lidded metal reduction container with approved combustibles. The oxygen-poor chamber changes glazes and darkens exposed clay.
The word raku has a more specific Japanese context. Raku ware is tied to hand-formed tea bowls used in chanoyu, the Japanese tea ceremony, and to a maker lineage reaching back to the late sixteenth century. Those bowls value touch, quiet form, and the relationship between vessel, host, guest, and tea. Modern Western raku is not the same as historical Japanese Raku ware. In many studios, raku means the fast kiln removal and post-firing reduction process popularized in twentieth-century studio ceramics.
That distinction matters because raku is not just a crackle look. The firing method affects clay strength, glaze behavior, safety planning, and use. If you are comparing firing options, PotteryKey also has a broader overview of common pottery firing techniques and a step-by-step look at how pottery is made.
The basic raku sequence
A modern Western raku firing usually follows this pattern:
- Make simple, resilient forms. Even walls, open shapes, and clean joins give the clay a better chance when heat changes quickly.
- Bisque fire the work. Bisque ware is easier to handle and glaze than bone-dry clay, and it removes one variable from the raku firing.
- Apply a raku surface. Studios may use crackle glazes, copper glazes, naked raku slips, resist methods, or other approved low-fire treatments.
- Heat in a raku kiln. Gas raku kilns are common because they heat quickly and can be opened or lifted for fast access.
- Move the hot ware. Trained operators use long raku tongs, protective clothing, and a clear path from kiln to reduction area.
- Reduce, cool, and clean. The pot may sit in a lidded reduction container before it cools enough for soot and loose residue to be cleaned away.
The exact temperature, timing, and reduction routine depend on the clay, glaze, kiln, weather, and studio practice. Raku can look spontaneous, but reliable results come from notes and repeated tests. Record the clay body, bisque temperature, glaze thickness, kiln temperature, reduction material, reduction time, and final surface.
Clay and glaze choices
Raku is hard on clay. The work is heated quickly, lifted while hot, and cooled faster than it would be in most kiln firings. Many potters choose a raku clay body with grog or other temper because it can handle thermal shock better than a smooth, dense body. Porcelain, very tight clay bodies, heavy bases, large flat slabs, closed forms, and uneven walls are more likely to crack or fail.
Glazes are chosen for low-fire response and surface character. Crackle glazes depend on a fit mismatch between clay and glaze. Smoke settles into those fine lines and makes the pattern visible. Copper glazes can shift toward reds, greens, blues, or metallic luster in reduction, though the results vary a lot from firing to firing. Naked raku uses slip and resist layers that are removed after firing, leaving smoke patterns on the clay rather than a permanent glaze coating.
Those surfaces can be striking, but they come with limits. Crackle can absorb liquid. Metallic surfaces can be delicate. Some decorative finishes are not stable enough for eating or drinking. Finished raku pieces are usually decorative rather than food-safe. Unless a specific clay and glaze combination has been tested and designed for food contact, treat raku as display pottery, sculpture, wall work, or vessels for dry, non-food uses.
What the reduction chamber does
The reduction chamber is usually a lidded metal container on a noncombustible surface. When the hot pot touches the combustible material, the material ignites. Once the lid goes on, oxygen becomes limited, smoke fills the chamber, and some glazes respond to the changed atmosphere. Unglazed clay can darken, crackle lines can become more obvious, and copper-bearing glazes may shift color.
The material in the chamber matters. Sawdust, shredded paper, dry leaves, and other studio-approved materials burn at different speeds and produce different smoke. They also create different cleanup, ventilation, and fire concerns. Avoid treated wood, glossy printed material, plastics, or mystery scraps. Use what the instructor or studio allows, and plan the smoke path before the firing starts. If sustainability is part of your pottery practice, PotteryKey's guide to eco-friendly pottery choices is useful background, but raku smoke still needs ventilation, fire awareness, and local compliance.
Safety comes before surface effects
Raku should be treated as a live-fire studio process. The kiln area needs ventilation, clear walking paths, a fire-safe surface, safe distance from buildings and vegetation, and a way to control or extinguish combustibles. Local rules may limit outdoor flame, smoke, propane use, or open burning. A responsible studio should have suitable fire extinguishers, water or sand where appropriate, first-aid supplies, and a trained person in charge of the firing.
Protective gear helps, but gear does not make raku safe by itself. Heat-resistant kiln gloves, face and eye protection, natural-fiber clothing, closed-toe footwear, and long raku tongs are common parts of a studio setup. Some tasks may call for respiratory protection, but a respirator has to be chosen and fitted properly, and it is not a replacement for ventilation or smoke control. Treat product labels as a starting point for questions, not as permission to improvise.
If you want to learn the equipment vocabulary before a class, broad Amazon searches for raku pottery books, raku pottery tongs, heat resistant kiln gloves, and ceramic respirator masks can help you see the categories people discuss. Do not assume a search result is suitable for raku because it mentions pottery, heat, or safety. Confirm specifications, fit, heat ratings, and studio requirements with a qualified teacher or kiln manager.
Should beginners buy a raku kiln?
Most beginners should not start by buying or building a raku kiln. A better first step is to take a class, observe a firing, and see how an experienced studio handles propane, kiln placement, hot work, reduction containers, smoke, cleanup, and emergencies. If you later compare kiln options, start with general kiln education, such as PotteryKey's guide to kilns for home studios, then talk to local instructors, suppliers, and fire authorities before making decisions.
Raku may also be the wrong first pottery project. New potters usually benefit from learning forming, trimming, drying, bisque firing, and basic glazing before adding flame and reduction variables. PotteryKey's beginner pottery guide is a better starting point if you are still building basic clay skills. If your main goal is surface decoration, not live firing, you might also explore pottery painting ideas and compatible paints for lower-risk decorative practice.
Good first steps for learning raku
Start by watching a firing from setup through cleanup. Notice where pieces are staged, how people communicate near the kiln, where reduction cans sit, how the hot path is kept clear, and when anyone is allowed to touch the work. Then take a supervised workshop where the instructor provides clay guidance, approved glazes, a safety briefing, and clear firing roles.
For early tests, keep the work small and open. Bowls, cups intended for display, tiles, and simple sculptural pieces are easier to manage than large platters, heavy vases, or complex lidded forms. Make more than one test piece because raku can vary even within the same firing. Expect some cracking and some surfaces that do not match the plan. That is part of the learning curve, not a reason to skip the controls.
Raku is compelling because it makes firing visible. Flame, smoke, heat, and timing all leave evidence on the pot. The best way to approach it is with respect for both sides of the word: the Japanese tea context that shaped Raku ware, and the modern Western studio process many potters now practice. With patient instruction, suitable materials, and a properly managed firing area, raku can be a thoughtful way to study surface, chance, and control in ceramics.